Well, we had our Mad Hatter's Birthday Tea Party over the weekend for my lovely other half, although, sadly no photos! Terrible, I know!
He requested a Rum and Raisin cake as his birthday cake, but I couldn't find a recipe I liked the sound of online. So, I took a gamble, made my own, and luckily, it turned out lovely. The only downside is I have no photo! Means I might have to make it again ;)
Ingredients:
Cake:
225g Self Raising Flour
50g Cocoa Powder
1/2 tsp Bicarbonate of Soda
225g Caster Sugar
175g Butter or Spread
3 Large Eggs
100g Raisins
2 tbsp Dark Rum (Optional)
Filling:
300ml Double Cream
2 tsp Dark Rum (Optional)
Topping:
100g Plain Chocolate (or Milk Chocolate if you prefer)
Method:
Preheat oven to Gas Mark 4
Grease 2x 8" cake tins, and line with grease proof paper.
Cream butter and sugar until the colour pales and you have a smooth, well combined mixture.
Beat in eggs and rum, if using.
Sift flour, cocoa powder and bicarbonate of soda into the bowl, and fold in until well combined, with a smooth, even colour.
Lightly stir in the raisins.
Pour into the two cake tins and bake for 35 mins.
Remove from oven and allow to cool completely.
Whip the cream with the rum until fully whipped, and use to sandwich the cakes together.
Melt the chocolate in a bowl over a pan of simmering water, allow to cool for 1 minute, then spoon over the top of the cake.
Cut yourself and your loved ones a large slice and enjoy!
If anyone does make this cake, I would be delighted if you shared a photo, and would be more than happy to link your blog/wesbite if I may use it!
Enjoy :)
Tuesday 29 November 2011
Christmas Wreath and Robin Tree Decorations
I finished the Christmas Wreath I was making. It's made entirely with felt and stuffing, so no polystyrene form in this one.
I used two large circles of felt for the wreath, and decorated with ponsiettas, using the same template I'd made for my napkin rings (will post photos soon, but I plan on making more, so saving it for a Napkin Ring post). I'm really happy with how it turned out, and the criss-cross ribbon finishes it off just nicely. I think I'll make more of these over Winter in Spring colours, ready for early next year.

I've also made a set of felt robins as well. In actual fact, I made these before the red and white birds I posted about last time, but hadn't photographed them. Again, I made up the templates myself, then used my cardboard template to cut several pieces of felt in the identical shape. Added the red breast and did simple french knots for the eyes.

Just a few more pieces to finish off now before the craft fayre this weekend!
Wednesday 23 November 2011
Felt Christmas Tree Decorations
This is why I chose to call my blog Little Felt House. It's a name I think I'll use for my little creations, because I work primarily with felt. Not just felt, but a lot of it.
And this is what I've been making recently: Christmas Tree Decorations.
Yup, it really is nearly that time of year again. These little ones will be for sale on my stall at the craft fayre at the start of December, and any left overs will probably sneak onto my Christmas Tree!


I've also made little robins, and stars so far. As well as a felt Christmas wreath with ponsiettas, and matching napkin rings. Photos to follow!
The little birdies are my own (albeit very simple, and no doubt done before) design, hand drawn, cardboard template, and then lots of little, stuffed, squishy felt birdies with a touch of embroidery.
More coming up!!
Tuesday 22 November 2011
Christmas Bunting
So, I have a craft fayre in a couple of weeks (just less, in fact) and as my first Christmas craft fayre, I decided to make some christmassy bunting to decorate my stand with. I've made bunting previously, but I fancied something red and green.
As usual, I browsed eBay for offcuts of fabric, there's so much pretty and unusual stuff out there amongst the ordinary... I almost decided on some lovely pine green with white snowflakes, but then at the last minute decided to go for red gingham instead!
I prefer to use bias binding for the 'string' of my bunting. It irons very well, so you get a perfect, double sided fabric 'tape' that works perfectly, with perfectly neat edges. Of course, I chose green to contrast with the red and white fabric :)
So, here you go then.

Now, I have to say, I insist on double-sided bunting triangles. Whether in the same, or a contrasting fabric, I just think it makes it look finished. Raw, unhemmed, single layers of fabric just doesn't do it for me!
I used my machine to sew the triangles - just the two angled sides, and left the tops unhemmed, as this bit is covered by the bias binding.
I then measure out my spacing by eye, and hand sew along the bias binding, with the triangle sandwiched in between.

Ta da! It will actually debut this weekend at our Mad Hatter's Tea Party, prior to the Christmas craft fayre, as bunting and tea parties go hand in hand! And I'm all for getting the most use out of my hand crafted items - they're for display, not to store away!
Coming up - felt Christmas tree decorations!
Friday 18 November 2011
Halloween - Tim Burton's Alice in Wonderland and Mad Hatter costumes.

It would have been nice to post this before Halloween, getting in the true spirit of things, but I was so busy making the damn thing, I just didn't have time.
Better late than never, right?
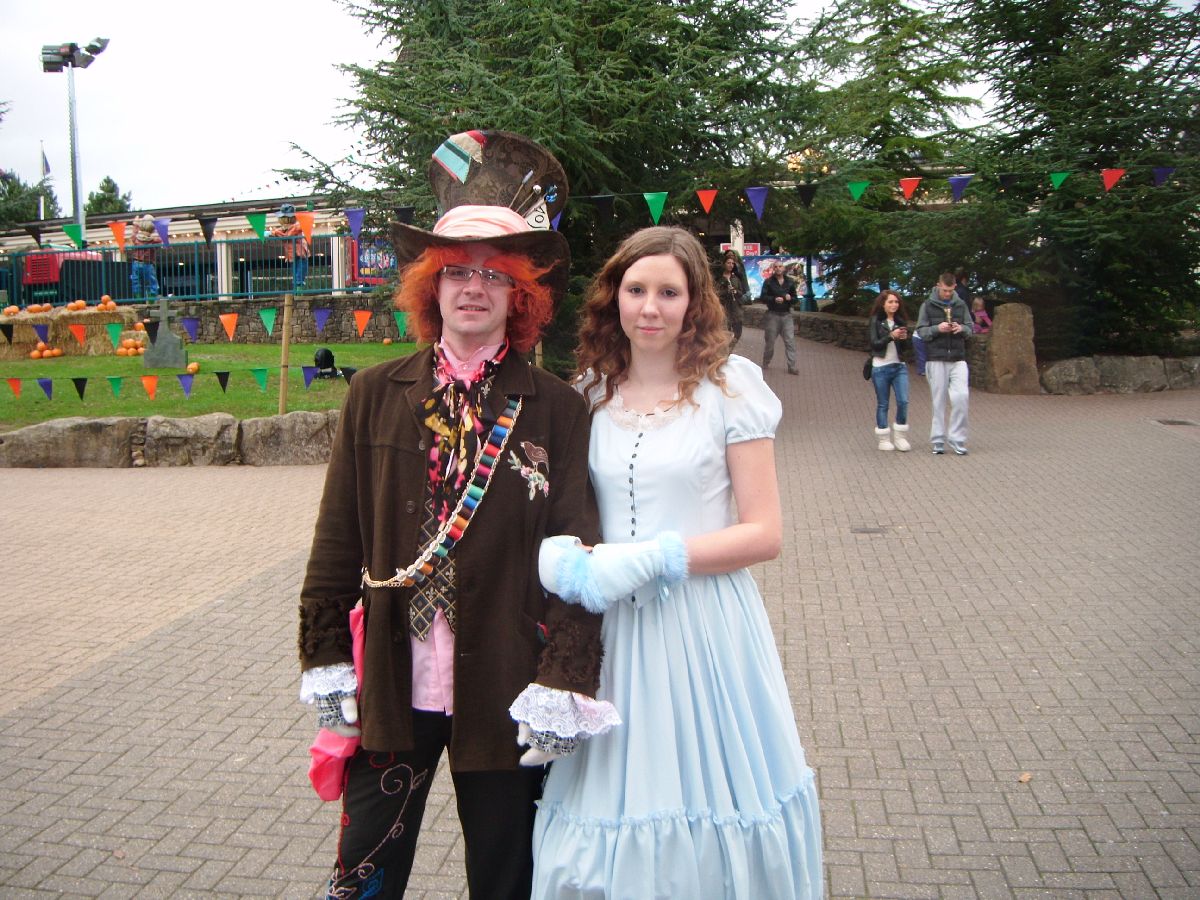
Here goes then. Knowing we were spending a couple of days at Alton Towers for Halloween with a group of friends, Adam and myself decided on fancy dress costumes several months in advance. We dressed up last year (Zombie, and Zombie Where's Wally) but this year Adam got it into his head he wanted to go as The Mad Hatter.
After watching Tim Burton's Alice in Wonderland, I decided, okay, I can do that. The craft & costume thing, unsurprisingly, is left down to me. I decided to go as Alice, seeing as we wanted to go as a sort of couple, ever though they're not quite a couple in the film, it's the closest we could manage!
I started off looking on eBay and in local charity shops, for a simple blue dress. Unlike the traditional Alice, Tim Burton's Alice wears a long, slightly Victorian style gown in pale blue. I thought this would be the most simple, easy bit of the outfits. But no.
Because seemingly, you can't just buy a plain ol' blue dress. I couldn't even get a white one that I could dye blue. Nothing was quite right. After chatting to my Mum, she offered to make a dress. Yup, that's right, make one. And here's where the excessive effort begins.
She found this Simplicity Pattern online at http://www.sewingworld.co.uk/Simplicity_Costumes.html and though a jacket and skirt, it was the right style, down to the ruffle on the skirt, and she figured she could adapt the jacket into a short sleeved bodice.

We bought quite a range of fabrics in the end, due to some of them not being quite right, and sadly, the organza I bought for the top layer just wasn't working. Instead, we decided to go for a double layer of the lining fabric, which I'm glad about, as it was definitely easier to embroider than the organza would have been.
And so on to that touchy subject of the embroidery.
Using examples from the Flickr set here http://www.flickr.com/photos/40787728@N05/sets/72157621835279288/with/3756798119/ and in particular, this photo

(image taken from the above website, please note, this is not my dress/photo)
I used it create my own design for the dress, drew the images free hand, then traced through the top layer of my dress, and hand embroidered the whole thing. Now my dress was SIX METRES wide round the bottom of the dress - a whole load of fabric went into making the thing, and my Mum did a beautiful job, but that meant I had to embroider this tricky, complex pattern over and over until I'd filled six metres worth. And boy, did that take a while! I actually ended up working out a little schedule, and was literally coming home from work and embroidering at least 3 hours a night, as it was the only way I could get the dress finished in time. But I'm so pleased with the results.

I know I didn't have to do this, I could have painted it on, pen, used lace instead, left it off entirely, but my Mum had put so much effort into making the dress, I wanted to add the details too. But it took 71 hours in total, just to do this bit, and it was just a small detail on the dress!
I was lucky in that I managed to find the exact same buttons as were on the original dress, so I was really pleased about that, and I added the cream lace and black ribbon to the neckline, which was similar to the original dress.
It's not exactly the same, the fabric is slightly different, the details are a little different, but it's so much closer than a store bought dress and I'm really proud of all the work that I put into it. And I can't thank my Mum enough for making the actual skirt and bodice for me.


LOL at my face!
I added a trim detail to the cuffs of the jacket, embroidered a bird patch from scratch to go on the breast of the jacket, added a pink scarf and multitude of ribbons to the pockets, like the original. The wing-tip collared shirt we dyed pink, the neck scarf was made too, and the trousers were hemmed short, adding the spare fabric from the hems in the sides to create a small flare, putting wire in the bottom of the hem to create the funky shape, and then embroidering the trouser leg too. These took days to do!
It was difficult to get a really good image of the trouser embroidery, there was little online, but I did my best!
Lots of string and wire later, we managed to tightly secure all those cotton reels onto the gold chain. We cut down a thin leather belt to attach at the back, which is how it fastens on.
Even the lace cuffs and hand warmers were copied as well as I could from Johnny Depp's costume. Oh, and one pink stripey sock, and one one red one! We really did our best to copy as much as we could. Down to the orange hair (coloured hair spray, plus lots of backcombing and hair spray) and huge eyebrows, which I made with roving, softly needle felted at one edge of them.
The hat was a bit of a triumph.
I wish I'd taken photos of the various stages, but I was getting a little stressed out at how long everything was taking, and how little time I had left to complete everything in. Made from card, paper mache, foam board, fabric, net curtain and spray paint, the hat took around 10 days to complete over weekends and evenings.
I sprayed it with black, brown and gold spray paints, and added the details like the salmon coloured scarf, the peacock feather, ribbon patch trim, hat pins and of course, the 10/6 card. For this, again I tried to copy the original as close as possible, right down to the font of the numbers, and burning the edges of the card.
It was ridiculously heavy, but bless him, Adam wore it all day long. I'm so proud of how it turned out!


We had such a fantastic day on Halloween, and luckily, the costumes turned out great - we even got asked for a couple a photos from strangers!

The only downside was that it prompted us to start talking about next year's costumes! Although, I guess a little part of me is excited about the idea - just give me a few months break first!

Buy of the Month - Nicky Clarke Slim Barrel Curling Tongs
This is actually an October post. I just happen to be posting it in November.
That's because I am so behind in everything I have to blog about. Ensue mad rush of blogging... now! (Warning: This may cause excessive typos)
So, let me explain. September and October were pretty devoid of blogs because I was uber busy spending every spare minute I wasn't at work on my Halloween costumes. I know that sounds a little extreme, but a while back, me and my other half decided we wanted Alice in Wonderland and Mad Hatter costumes (the Tim Burton film ones) and it got a little OTT and we ended up trying to copy the outfits exactly. Which meant a helluva lot more work. Like 71 hours of hand embroidery... but more about that in the next post.
So, this post is about my October Buy of the Month. And I really didn't buy much that month, but with Mia Wasikowska having wavy/curly hair as Alice in the film, and me having naturally straight hair, I decided to treat myself to a pair of curling tongs, and after a couple of You Tube reviews, found that these Nicky Clarke ones were perfect.

They have a super slim barrel for making eeny weeny little curls, but you can do looser waves with them too. I've only used them properly on Halloween, but I plan on having a lot more curly hair in future.
Plus, I managed to find someone on eBay selling them cheaper than the RRP, so even better.
Definitely recommend!
And stay tuned for the Halloween post... I have a feeling it'll be a biggy!
Subscribe to:
Posts (Atom)