Showing posts with label crafts. Show all posts
Sunday, 22 April 2012
A Little Felt House Giveaway !
Yup, I've decided to hold a giveaway on my facebook page http://www.facebook.com/littlefelthouse just as soon as the page reaches 150 likes! And if it goes well, I'll do another at 200 likes :)
So, I'm going to spend the week picking and choosing some special Little Felt House goodies out for the giveaway, and all you have to do for now is share the link and like the facebook page!
As soon as I get to 150 likes I'll do a simple 'comment below' style entry for the giveaway.
Yay if you like free stuff (YAY!)
:)
E x
Saturday, 14 April 2012
New hand sewn felt birthday & greetings cards :)
Well, back at Little Felt House, there's finally been a little quiet time to craft with felt!
What I love best :) I've been making up a few new birthday and greetings cards:
So far, a hand embroidered cake, and some number cards. And on the back:

I had this 'Hand Sewn by LITTLE FELT HOUSE' stamp made a while back, so happy to have finally used it!
I really had fun making these - I don't have enough time to sew! I also made up some printed fabric cards too, with rubber stamps and a mixture of fabrics - linen, upholstery scraps and floral cotton.
So, that's all for now, but hopefully I'll be doing more soon! :)
E x
What I love best :) I've been making up a few new birthday and greetings cards:
So far, a hand embroidered cake, and some number cards. And on the back:
I had this 'Hand Sewn by LITTLE FELT HOUSE' stamp made a while back, so happy to have finally used it!
I really had fun making these - I don't have enough time to sew! I also made up some printed fabric cards too, with rubber stamps and a mixture of fabrics - linen, upholstery scraps and floral cotton.
So, that's all for now, but hopefully I'll be doing more soon! :)
E x
Friday, 13 April 2012
My Facebook Page - Little Felt House for Handmade Goodies :)
In the interest of keeping things well connected, I can't believe I've only just thought of linking you my facebook page for Little Felt House.
Unlike this blog, which is a bit more lenient in it's content, the facebook page is solely for items crafted under the 'Little Felt House' name. It's still a hobby, not a business but sometimes it's just nice to share what you do, and maybe hopefully receive a little feedback - good or constructive! :)
So, here you are then:
http://www.facebook.com/pages/Little-Felt-House/112211542123070
Click click click!!!
Unlike this blog, which is a bit more lenient in it's content, the facebook page is solely for items crafted under the 'Little Felt House' name. It's still a hobby, not a business but sometimes it's just nice to share what you do, and maybe hopefully receive a little feedback - good or constructive! :)
So, here you are then:
http://www.facebook.com/pages/Little-Felt-House/112211542123070
Click click click!!!
Sunday, 18 March 2012
Handmade Cushions for Mothers Day
So, last week I sent my Mum a huge box of goodies for Mother's Day - moisturisers, black tea light candles, Yankee votive and holder, fabric, coffee, and these homemade cushions!
She's just had her house renovated, and decorated throughout, and gone for a cream & black colour scheme downstairs - hence cushions for the lounge. The granny square one is the one I made first - a crocheted cover, front and back, over a fabric covered inner cushion. I chose a brown moleskin type fabric for the inner, as the colour shows through the crochet nicely and blends with the hints of taupe in her decor.
I also made the simple, envelope style opening pillow from some striped fabric I had, and this amazing one from a beautiful lambswool jumper.
Sadly, my gorgeous other half machine-washed the delicate little beauty and shrunk it beyond all use :( Whoopsie. It felted up the wool so nicely though - it was like heavenly woollen fabric to use and sew up. Made such a snuggly cushion! I used the buttons from the neck to detail the front, and small buttons to do up the back. The closing on the back is slightly off-centre, as I had to work with what I had from the jumper, and as I'd centred the textured panel on the front, it threw the back out slightly, but not to worry.
She was super pleased, and is going to make some more coordinating ones herself. It's been nice to do some crafting again! Great to get the overlocker out, my needles and crochet hook.
Next - back to what Little Felt House is all about - sewing with felt!
Watch this space x
Wednesday, 18 January 2012
New Project - Braided Rag Rug
A new year brings new projects. Thankfully, I'm settling down in my new job I began in December, and I'm finally fitting in a bit of crafting on an evening.
I posted last year about huge amounts of jersey fabric I purchased at a bargain price. I've used bits and pieces, but there's just so much, and this has also been a useful way to use some of the larger pieces up.
Technically, the idea behind the braided rag rug, is to use rags! But not having much in the way of rags, and having so much of the jersey fabric, I've decided to do a small rug/mat in a single colour.
The fabric itself is a grey patterned knit fabric with a kind of speckled back to it. Without really realising it, as I was braiding the cut strips, they curved in on themselves, so that in the end, it is the back of the fabric that shows.
I began by cutting long strips (it helped that my fabric was circular, as I could just cut long spirals for huge, continuous lengths) and rolling into a ball. I tied three balls together, looped over a door knob and began braiding. The trickiest part was stopping the balls from getting knotted up, and it definitely helps to not make your balls of rag string too long. When they get close to running out, I simply sew the next piece on. You can knot it, but that will give you a knobbly appearance when finished.
I've nearly finished my braiding (I've literally just used up this piece of fabric I had, so the mat/rug will be as big/small as it's going to be, I'm not making a specific size) so a little more and then I'll begin to sew it together.
Sorry the pictures aren't great - crafting on an evening means artificial light which is never my favourite!
Can't wait to get this finished! Hoping the weekend will give me a little time to get some more work done on it. Yay for crafting again! Was really starting to miss making things!
I posted last year about huge amounts of jersey fabric I purchased at a bargain price. I've used bits and pieces, but there's just so much, and this has also been a useful way to use some of the larger pieces up.
Technically, the idea behind the braided rag rug, is to use rags! But not having much in the way of rags, and having so much of the jersey fabric, I've decided to do a small rug/mat in a single colour.
The fabric itself is a grey patterned knit fabric with a kind of speckled back to it. Without really realising it, as I was braiding the cut strips, they curved in on themselves, so that in the end, it is the back of the fabric that shows.
I began by cutting long strips (it helped that my fabric was circular, as I could just cut long spirals for huge, continuous lengths) and rolling into a ball. I tied three balls together, looped over a door knob and began braiding. The trickiest part was stopping the balls from getting knotted up, and it definitely helps to not make your balls of rag string too long. When they get close to running out, I simply sew the next piece on. You can knot it, but that will give you a knobbly appearance when finished.
I've nearly finished my braiding (I've literally just used up this piece of fabric I had, so the mat/rug will be as big/small as it's going to be, I'm not making a specific size) so a little more and then I'll begin to sew it together.
Sorry the pictures aren't great - crafting on an evening means artificial light which is never my favourite!
Can't wait to get this finished! Hoping the weekend will give me a little time to get some more work done on it. Yay for crafting again! Was really starting to miss making things!
Sunday, 8 January 2012
Felt Wedding Wreath - Ending 2011
Well, not only are we in the New Year, we're over a week in, so it doesn't feel all that new anymore! Hence, here is me apologizing for not blogging over Christmas and New Year! It's funny - you have more time than usual (less work) and yet, so much to do, and so little actual free time.
Things are necessarily any better at the moment - I started a new job mid-Decemeber, and I've just been assigned a new role there, so it's pretty busy, taking a lot of my time learning something entirely new, and also getting used to the earlier-than-normal starts. Enough moaning though :) 2012 has been pretty good so far.
However, before I get started with blogging about 2012 crafts, I just want to round up the end of 2011. The two main things I created in December were a Wedding Wreath, which was our gift at my partner's Uncle's wedding the week before Christmas, and a Christmas stocking for my lovely other half.
The wreath came about as a) I love working with felt, and making wreaths & flowers, and b) we wanted to give a personalised gift. Hence, a white and pale pistachio wreath! Finished with the happy couple's initials, and the date of the wedding. Here's wishing you a very happy life together, Steve and Cheryl.
Sadly, I did that really annoying thing of wrapping up and handing over the gift before I remembered I'd not taken a photo of it. Luckily my partner had taken a shot on his mobile phone, so although not an amazing picture, certainly better than nothing!
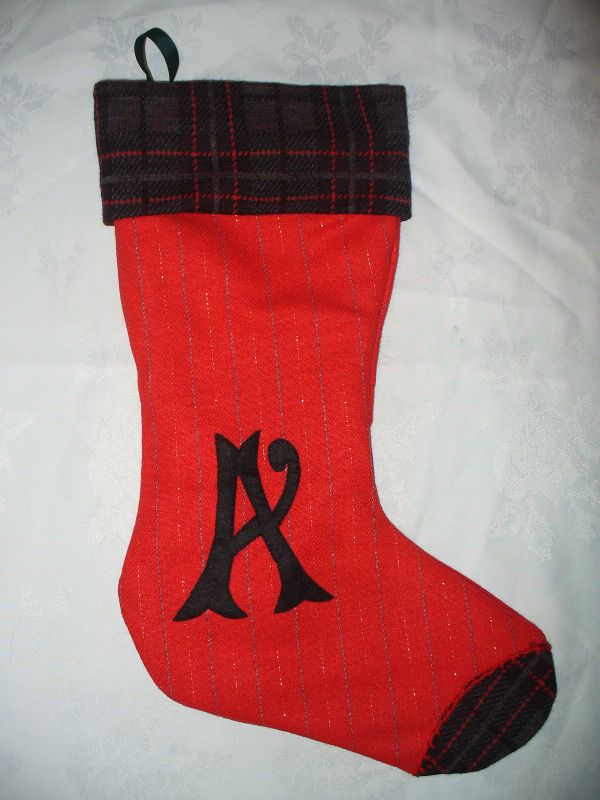
The Christmas stocking came about when I found myself home alone on the 23rd. Adam was at work, so I thought I'd use the bit of quiet time to whip up a stocking. I ended up making it all by hand, so wasn't such a quick project in the end, but he's definitely worth it :) and it was a funy way to spend the evening.
It's red striped wool fabric, lined with black jersey, with a tartan trim. Blanket stitch around the toe area, and then a felt 'A' to add that personalised touch. I was really pleased with how it came out, and it looked so cute with all Adam's little pressies in!
I was so lucky with all the lovely gifts I received at Christmas. My friends and family know me so well! In my bunch of lovely stuff I got 3 craft books - one on felt projects, one on vintage chic on a shoestring, and a knitting book full of glove patterns! Can't wait to try out some projects from these, and also a few other things I've had in mind, asap.
I've also just about finished two more granny square cushion covers - one regular sized and one mini one, so I'll post about those as soon as they're finished. All I need to do now is get settled into my new job so I can't start making the most of my free time when I'm at home!
Onwards and upwards then... here's to another good year!
Things are necessarily any better at the moment - I started a new job mid-Decemeber, and I've just been assigned a new role there, so it's pretty busy, taking a lot of my time learning something entirely new, and also getting used to the earlier-than-normal starts. Enough moaning though :) 2012 has been pretty good so far.
However, before I get started with blogging about 2012 crafts, I just want to round up the end of 2011. The two main things I created in December were a Wedding Wreath, which was our gift at my partner's Uncle's wedding the week before Christmas, and a Christmas stocking for my lovely other half.
The wreath came about as a) I love working with felt, and making wreaths & flowers, and b) we wanted to give a personalised gift. Hence, a white and pale pistachio wreath! Finished with the happy couple's initials, and the date of the wedding. Here's wishing you a very happy life together, Steve and Cheryl.
Sadly, I did that really annoying thing of wrapping up and handing over the gift before I remembered I'd not taken a photo of it. Luckily my partner had taken a shot on his mobile phone, so although not an amazing picture, certainly better than nothing!
The Christmas stocking came about when I found myself home alone on the 23rd. Adam was at work, so I thought I'd use the bit of quiet time to whip up a stocking. I ended up making it all by hand, so wasn't such a quick project in the end, but he's definitely worth it :) and it was a funy way to spend the evening.
It's red striped wool fabric, lined with black jersey, with a tartan trim. Blanket stitch around the toe area, and then a felt 'A' to add that personalised touch. I was really pleased with how it came out, and it looked so cute with all Adam's little pressies in!
I was so lucky with all the lovely gifts I received at Christmas. My friends and family know me so well! In my bunch of lovely stuff I got 3 craft books - one on felt projects, one on vintage chic on a shoestring, and a knitting book full of glove patterns! Can't wait to try out some projects from these, and also a few other things I've had in mind, asap.
I've also just about finished two more granny square cushion covers - one regular sized and one mini one, so I'll post about those as soon as they're finished. All I need to do now is get settled into my new job so I can't start making the most of my free time when I'm at home!
Onwards and upwards then... here's to another good year!
Saturday, 10 December 2011
Time for a long overdue Granny Blanket update.
Well, it's still not finished, but I am only one step away now. Just the mammoth task of sewing my squares together!
After finishing my 180 squares (180 different squares, all made with just 6 colours), I did one final round in cream on them all. This took... longer than anticipated. Part of it was that I just haven't had time - see previous posts on the 2 month long Hallowe'en costume, or making things for my Christmas craft fayre etc. plus hosting birthday parties, the general day to day, and sleeping now and again! Part of it was also motivation. After looking at these little squares for so long now, I'm becoming a little disallusioned with them now. I'm not so sure I love the colour combination anymore, but I'm hoping that will change because a whole lot of man hours have gone into this thing so far.
So, here are my squares!
Each little pile here contains 12 squares, and each square has the 4 inner colours in a different combination. Each of the 15 piles has a different combination of 4 out of 6 colours, so in total, that's 180 completely different squares. No two are alike! I'm amazed this can be done with just 6 colours!
I wanted to have a rough idea of size, and how it might look once finished, so I laid them out on the bed for a rough idea - this also took longer than expected!
Part of me is looking forward to it being finished - of course, I love to see my projects finalise into a finished product, but at the same time, I still have that lingering feeling of not loving it, and knowing I just don't have the time or will power to make another 180 squares in other colours!!
I guess we'll have to wait and see! Christmas is going to busy, so more than likely, I'll post pics of the finished blanket some time in the New Year. I think I'll be doing plenty of other things before then though!
Sunday, 4 December 2011
Etsy Shop Update - Properly Up & Running
Yay!
Here we go - I've added a bunch of things onto etsy now and will hopefully get it up and running over Christmas. For now, lots of Christmassy things on there.
Hope you enjoy!
http://www.etsy.com/shop/LittleFeltHouse?ref=seller_info
Here we go - I've added a bunch of things onto etsy now and will hopefully get it up and running over Christmas. For now, lots of Christmassy things on there.
Hope you enjoy!
http://www.etsy.com/shop/LittleFeltHouse?ref=seller_info
Saturday, 3 December 2011
My Christmas Craft Fayre!
Today was a fun day. The pub where my boyfriend works (Salt @ The George, Mumbles) had it's first craft fayre today and I was really happy to have a stand there.
It was such a lovely atmosphere, the huuuge Christmas tree looks amazing, and the mulled wine was scrummy! Very festive, and I got to meet some lovely new people which is always a pleasure. I didn't take many photos, and actually spent much of the afternoon crocheting more cushion panels. I did take a couple of my stall though, and I'll try and do better next time!
I had a few sales too, so all in all, can't complain. I really should think of planning some more!
It was such a lovely atmosphere, the huuuge Christmas tree looks amazing, and the mulled wine was scrummy! Very festive, and I got to meet some lovely new people which is always a pleasure. I didn't take many photos, and actually spent much of the afternoon crocheting more cushion panels. I did take a couple of my stall though, and I'll try and do better next time!
I had a few sales too, so all in all, can't complain. I really should think of planning some more!
That's all for now! I'm finally in the festive mood - even my early Christmas shopping hadn't gotten me there, but that fruity and spicy mulled wine has finally done the trick! Will blog again soon though, I know it's definitely time for a granny square blanket update!
Friday, 2 December 2011
Felt Napkin Rings : Poinsettias and Roses
Well, the craft fayre is in the morning! Woop. I've been busy today labelling things up and helping Adam make my twigs-in-a-pot stand for my Christmas Tree decorations, yay!
I did say, however, I was going to post about my Napkin Rings, and so here it is. I finally got around to taking photos this morning, and first up, Poinsettias.
You'll have already seen this design on the wreath I posted about, but I actually made the pattern for the napkin rings first, and voila!
This was a set of six, and I wanted to make a smaller set too, but something a bit different. I settled for roses, and decided on neon pink. Huzzah! A very different set to the ponsiettas, but still very bold and bright!
And combined from the previous wreath, and these cutesy roses, I've made up my mind what to make as the wedding gift I need for later this month - a white, embroidered and rose decorated wreath. Just settling on colours to use and then there'll be a blog about that too in a couple of weeks.
Hope you're all smiling, and if you're crafting too, let me know what you're making!
Wish me luck for tomorrow!
I did say, however, I was going to post about my Napkin Rings, and so here it is. I finally got around to taking photos this morning, and first up, Poinsettias.
You'll have already seen this design on the wreath I posted about, but I actually made the pattern for the napkin rings first, and voila!
This was a set of six, and I wanted to make a smaller set too, but something a bit different. I settled for roses, and decided on neon pink. Huzzah! A very different set to the ponsiettas, but still very bold and bright!
And combined from the previous wreath, and these cutesy roses, I've made up my mind what to make as the wedding gift I need for later this month - a white, embroidered and rose decorated wreath. Just settling on colours to use and then there'll be a blog about that too in a couple of weeks.
Hope you're all smiling, and if you're crafting too, let me know what you're making!
Wish me luck for tomorrow!
Tuesday, 29 November 2011
Christmas Wreath and Robin Tree Decorations
I finished the Christmas Wreath I was making. It's made entirely with felt and stuffing, so no polystyrene form in this one.
I used two large circles of felt for the wreath, and decorated with ponsiettas, using the same template I'd made for my napkin rings (will post photos soon, but I plan on making more, so saving it for a Napkin Ring post). I'm really happy with how it turned out, and the criss-cross ribbon finishes it off just nicely. I think I'll make more of these over Winter in Spring colours, ready for early next year.
I've also made a set of felt robins as well. In actual fact, I made these before the red and white birds I posted about last time, but hadn't photographed them. Again, I made up the templates myself, then used my cardboard template to cut several pieces of felt in the identical shape. Added the red breast and did simple french knots for the eyes.
Just a few more pieces to finish off now before the craft fayre this weekend!
I used two large circles of felt for the wreath, and decorated with ponsiettas, using the same template I'd made for my napkin rings (will post photos soon, but I plan on making more, so saving it for a Napkin Ring post). I'm really happy with how it turned out, and the criss-cross ribbon finishes it off just nicely. I think I'll make more of these over Winter in Spring colours, ready for early next year.
I've also made a set of felt robins as well. In actual fact, I made these before the red and white birds I posted about last time, but hadn't photographed them. Again, I made up the templates myself, then used my cardboard template to cut several pieces of felt in the identical shape. Added the red breast and did simple french knots for the eyes.
Just a few more pieces to finish off now before the craft fayre this weekend!
Wednesday, 23 November 2011
Felt Christmas Tree Decorations
This is why I chose to call my blog Little Felt House. It's a name I think I'll use for my little creations, because I work primarily with felt. Not just felt, but a lot of it.
And this is what I've been making recently: Christmas Tree Decorations.
Yup, it really is nearly that time of year again. These little ones will be for sale on my stall at the craft fayre at the start of December, and any left overs will probably sneak onto my Christmas Tree!
I've also made little robins, and stars so far. As well as a felt Christmas wreath with ponsiettas, and matching napkin rings. Photos to follow!
The little birdies are my own (albeit very simple, and no doubt done before) design, hand drawn, cardboard template, and then lots of little, stuffed, squishy felt birdies with a touch of embroidery.
More coming up!!
And this is what I've been making recently: Christmas Tree Decorations.
Yup, it really is nearly that time of year again. These little ones will be for sale on my stall at the craft fayre at the start of December, and any left overs will probably sneak onto my Christmas Tree!
I've also made little robins, and stars so far. As well as a felt Christmas wreath with ponsiettas, and matching napkin rings. Photos to follow!
The little birdies are my own (albeit very simple, and no doubt done before) design, hand drawn, cardboard template, and then lots of little, stuffed, squishy felt birdies with a touch of embroidery.
More coming up!!
Tuesday, 22 November 2011
Christmas Bunting
So, I have a craft fayre in a couple of weeks (just less, in fact) and as my first Christmas craft fayre, I decided to make some christmassy bunting to decorate my stand with. I've made bunting previously, but I fancied something red and green.
As usual, I browsed eBay for offcuts of fabric, there's so much pretty and unusual stuff out there amongst the ordinary... I almost decided on some lovely pine green with white snowflakes, but then at the last minute decided to go for red gingham instead!
I prefer to use bias binding for the 'string' of my bunting. It irons very well, so you get a perfect, double sided fabric 'tape' that works perfectly, with perfectly neat edges. Of course, I chose green to contrast with the red and white fabric :)
So, here you go then.
Now, I have to say, I insist on double-sided bunting triangles. Whether in the same, or a contrasting fabric, I just think it makes it look finished. Raw, unhemmed, single layers of fabric just doesn't do it for me!
I used my machine to sew the triangles - just the two angled sides, and left the tops unhemmed, as this bit is covered by the bias binding.
I then measure out my spacing by eye, and hand sew along the bias binding, with the triangle sandwiched in between.
Ta da! It will actually debut this weekend at our Mad Hatter's Tea Party, prior to the Christmas craft fayre, as bunting and tea parties go hand in hand! And I'm all for getting the most use out of my hand crafted items - they're for display, not to store away!
Coming up - felt Christmas tree decorations!
As usual, I browsed eBay for offcuts of fabric, there's so much pretty and unusual stuff out there amongst the ordinary... I almost decided on some lovely pine green with white snowflakes, but then at the last minute decided to go for red gingham instead!
I prefer to use bias binding for the 'string' of my bunting. It irons very well, so you get a perfect, double sided fabric 'tape' that works perfectly, with perfectly neat edges. Of course, I chose green to contrast with the red and white fabric :)
So, here you go then.
Now, I have to say, I insist on double-sided bunting triangles. Whether in the same, or a contrasting fabric, I just think it makes it look finished. Raw, unhemmed, single layers of fabric just doesn't do it for me!
I used my machine to sew the triangles - just the two angled sides, and left the tops unhemmed, as this bit is covered by the bias binding.
I then measure out my spacing by eye, and hand sew along the bias binding, with the triangle sandwiched in between.
Ta da! It will actually debut this weekend at our Mad Hatter's Tea Party, prior to the Christmas craft fayre, as bunting and tea parties go hand in hand! And I'm all for getting the most use out of my hand crafted items - they're for display, not to store away!
Coming up - felt Christmas tree decorations!
Friday, 18 November 2011
Halloween - Tim Burton's Alice in Wonderland and Mad Hatter costumes.
It would have been nice to post this before Halloween, getting in the true spirit of things, but I was so busy making the damn thing, I just didn't have time.
Better late than never, right?
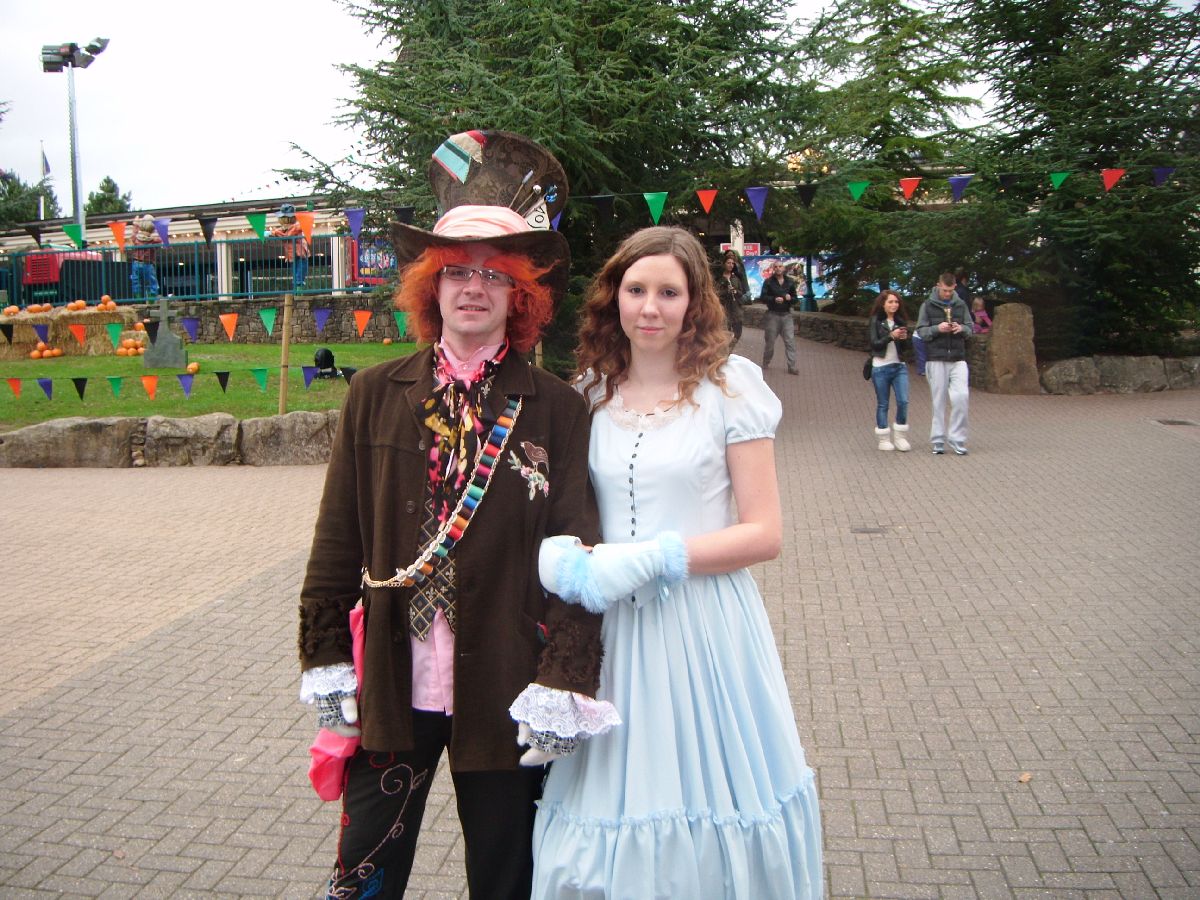
Here goes then. Knowing we were spending a couple of days at Alton Towers for Halloween with a group of friends, Adam and myself decided on fancy dress costumes several months in advance. We dressed up last year (Zombie, and Zombie Where's Wally) but this year Adam got it into his head he wanted to go as The Mad Hatter.
After watching Tim Burton's Alice in Wonderland, I decided, okay, I can do that. The craft & costume thing, unsurprisingly, is left down to me. I decided to go as Alice, seeing as we wanted to go as a sort of couple, ever though they're not quite a couple in the film, it's the closest we could manage!
I started off looking on eBay and in local charity shops, for a simple blue dress. Unlike the traditional Alice, Tim Burton's Alice wears a long, slightly Victorian style gown in pale blue. I thought this would be the most simple, easy bit of the outfits. But no.
Because seemingly, you can't just buy a plain ol' blue dress. I couldn't even get a white one that I could dye blue. Nothing was quite right. After chatting to my Mum, she offered to make a dress. Yup, that's right, make one. And here's where the excessive effort begins.
She found this Simplicity Pattern online at http://www.sewingworld.co.uk/Simplicity_Costumes.html and though a jacket and skirt, it was the right style, down to the ruffle on the skirt, and she figured she could adapt the jacket into a short sleeved bodice.
We bought quite a range of fabrics in the end, due to some of them not being quite right, and sadly, the organza I bought for the top layer just wasn't working. Instead, we decided to go for a double layer of the lining fabric, which I'm glad about, as it was definitely easier to embroider than the organza would have been.
And so on to that touchy subject of the embroidery.
Using examples from the Flickr set here http://www.flickr.com/photos/40787728@N05/sets/72157621835279288/with/3756798119/ and in particular, this photo
(image taken from the above website, please note, this is not my dress/photo)
I used it create my own design for the dress, drew the images free hand, then traced through the top layer of my dress, and hand embroidered the whole thing. Now my dress was SIX METRES wide round the bottom of the dress - a whole load of fabric went into making the thing, and my Mum did a beautiful job, but that meant I had to embroider this tricky, complex pattern over and over until I'd filled six metres worth. And boy, did that take a while! I actually ended up working out a little schedule, and was literally coming home from work and embroidering at least 3 hours a night, as it was the only way I could get the dress finished in time. But I'm so pleased with the results.
I know I didn't have to do this, I could have painted it on, pen, used lace instead, left it off entirely, but my Mum had put so much effort into making the dress, I wanted to add the details too. But it took 71 hours in total, just to do this bit, and it was just a small detail on the dress!
I was lucky in that I managed to find the exact same buttons as were on the original dress, so I was really pleased about that, and I added the cream lace and black ribbon to the neckline, which was similar to the original dress.
It's not exactly the same, the fabric is slightly different, the details are a little different, but it's so much closer than a store bought dress and I'm really proud of all the work that I put into it. And I can't thank my Mum enough for making the actual skirt and bodice for me.
I was lucky in that I managed to find the exact same buttons as were on the original dress, so I was really pleased about that, and I added the cream lace and black ribbon to the neckline, which was similar to the original dress.
It's not exactly the same, the fabric is slightly different, the details are a little different, but it's so much closer than a store bought dress and I'm really proud of all the work that I put into it. And I can't thank my Mum enough for making the actual skirt and bodice for me.
LOL at my face!
I added a trim detail to the cuffs of the jacket, embroidered a bird patch from scratch to go on the breast of the jacket, added a pink scarf and multitude of ribbons to the pockets, like the original. The wing-tip collared shirt we dyed pink, the neck scarf was made too, and the trousers were hemmed short, adding the spare fabric from the hems in the sides to create a small flare, putting wire in the bottom of the hem to create the funky shape, and then embroidering the trouser leg too. These took days to do!
It was difficult to get a really good image of the trouser embroidery, there was little online, but I did my best!
Lots of string and wire later, we managed to tightly secure all those cotton reels onto the gold chain. We cut down a thin leather belt to attach at the back, which is how it fastens on.
Even the lace cuffs and hand warmers were copied as well as I could from Johnny Depp's costume. Oh, and one pink stripey sock, and one one red one! We really did our best to copy as much as we could. Down to the orange hair (coloured hair spray, plus lots of backcombing and hair spray) and huge eyebrows, which I made with roving, softly needle felted at one edge of them.
The hat was a bit of a triumph.
I wish I'd taken photos of the various stages, but I was getting a little stressed out at how long everything was taking, and how little time I had left to complete everything in. Made from card, paper mache, foam board, fabric, net curtain and spray paint, the hat took around 10 days to complete over weekends and evenings.
I sprayed it with black, brown and gold spray paints, and added the details like the salmon coloured scarf, the peacock feather, ribbon patch trim, hat pins and of course, the 10/6 card. For this, again I tried to copy the original as close as possible, right down to the font of the numbers, and burning the edges of the card.
It was ridiculously heavy, but bless him, Adam wore it all day long. I'm so proud of how it turned out!
We had such a fantastic day on Halloween, and luckily, the costumes turned out great - we even got asked for a couple a photos from strangers!
The only downside was that it prompted us to start talking about next year's costumes! Although, I guess a little part of me is excited about the idea - just give me a few months break first!
Subscribe to:
Posts (Atom)